Over the past few years I have been reading many archaeological journal articles on the prehistoric pottery made and used by people in many parts of the world. Questions about how people made and used this pottery have turning in my mind and in the summer of 2011 I decided to try some experiments with prehistoric pottery making and utilization. This blog post documents these experiments.
Clay
For my experiments I used local clay. My house happens to be based on a rather large deposit of soil w ith a high clay content. From the perspective of a home owner and gardener, this is very bad, but from a potter's perspective this is very good. If I dig down about 2 feet I run into a layer of what appears to be mostly clay.
Now this clay has a number of issues that require some additional steps in the pottery process. First, though mostly clay, it also includes sand, some gravel, and organic material. My guess is that, if I had the ability to range further than the 0.5 acres of my yard, I would be able to find deposits nearby of the same clay that had less sand, gravel, and organic matter, but that is currently not feasible, so I had to take an additional step of refining the clay before I could use it in pottery. The second issue with this clay is that it appears to exhibit some unusual traits when I am building a pot, which I will discuss in a different section. These traits, however, don't appear to negatively effect the final outcome.
Refining the clay
To remove the non-clay materials from the clay, I used a water sedimentation technique I saw in a YouTube video which can be found here. Basically, the video describes a process in which the clay soil is dissolved into a tub of water stirred well and allowed to settle. The heavier sand and gravel particles settle faster than the lighterclay particles, so I end up with
several layers of various textures of clay, sand, and gravel.
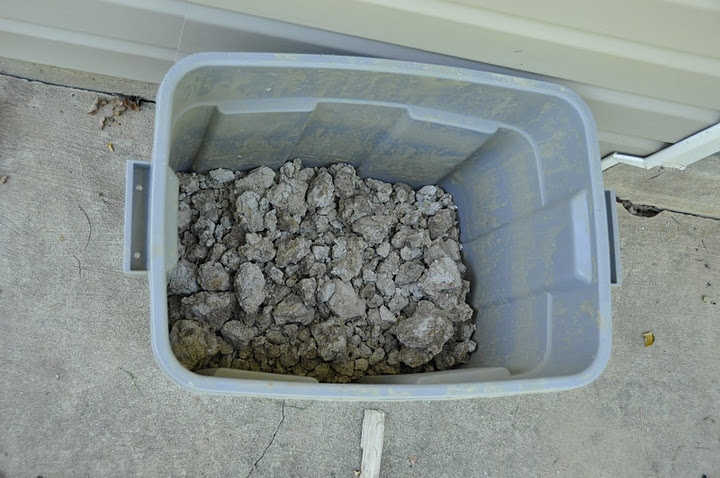
If you have a bone-dry chunk of clay and a wet chunk of clay and dunked them both into water, the bone-dry clay would quickly dissolve, but the wet chunk of clay would just sit there for days and only dissolve around the edges. Consequently, before dissolving the clay, I allow the clay to dry completely on my patio. When the clay is bone-dry, I then shovel it into the container and fill it with water. During this pro cess, I stir the mixture to help break up the clay. Once the container is filled, I stir some more until the clay is completely dissolved and suspended in the water. At this point I take a sieve and skim off any organic material that has floated to the top of the water and I then cover the container (I don't want any drowned squirrels) and leave it for a week or so. After about a week, the clay has settled to the bottom of the container with a layer of clear water above it. I remove the clear water with a siphon I made from
  a short length of garden hose. When most of the clear water has been removed, I allow the container to sit uncovered in the sun until the clay is about the consistency of toothpaste. At this point I take a small bowl or Tupperware container and begin skimming off the top inch or so of clay. This clay is placed on an old t-shirt which I have stretched out on the patio and allow to dry more. The first inch or so of clay is the highest quality. It took the longest to settle out of the water and has the finest particle size. The second, third, and forth inches are also pretty good, but after that it starts to get too course. So far, I've been careful to keep the different clay qualities separate to see if they exhibit different characteristics when they are fired. However, I have not noticed any differences in the final outcomes.
 Tempering the clay
Before it can be used to make pots, the clay has to be tempered. This consists of  adding other non-clay material to the pure clay. This changes the properties of the clay in a way that makes it more resilient when faced with sudden changes in temperature. Archaeologists have found a variety of temper types used in specimens including: silica sand, burned shell, grass, moss, dung, and crushed up pottery. So far, I have used silica sand and burned shell as temper. According to the academic accounts that I have read, silica sand is a relatively common form of temper and burned shell is one that is most resistant to thermal shock. For the sand I used a pure medium grained sand that I had found locally and for shell I used clam shells gathered on the Atlantic seashore. The shells were allowed to burn in a campfire for about 20 to 30 minutes, and, after they had cooled, crushed between two rocks into a sand-like consistency.
The Unique Qualities of My Local Clay
During the course of this project, I've ended up doing some research on clay itself and I've come to the realization that "clay" as a term is somewhat flexible. Not only can clay vary in purity, plasticity, and particle size, but it can also vary in chemical composition, pH, and particle shape. All of these factors will greatly influence a clay's usefulness in making pottery. My local clay is slightly less plastic than other clays that I had worked with in high school ceramics class. If I made a clay rope out of the clay typically used by modern potters, that rope would be extremely flexible for an extended period of time. My local clay is different in that it will at first be flexible, but then start to pull apart and crack. Also, typically when making a clay vessel in the past I would periodically coat the vessel mouth with water to keep it from drying out and to enhance its bonding to any clay I was adding. However, with the local clay, adding any additional water to the vessel walls while I am building the pot causes them to crack and break apart. My strategy for overcoming these unique clay characteristics has been to start out with the clay slightly more moist than normal and then not add any water while I am building the pot. This prevents the vessel from becoming too dry while I am building it and avoids cracking.
When I initially discovered this these unique characteristics, I was concerned that perhaps this clay would not be suitable for my experiments. I thought that this lack of plasticity might translate into a weaker and less versatile pot. Consequently, before using the local clay for my experiments, I decided to test its properties on a small scale. To test the clay I took a very small ball of fairly pure clay fro m my yard and molded it into two shot-glass sized bowls and allowed them to dry. Later I built a small campfire in my back yard and placed the bowls in the fire. I let the fire burn down to coals over the next hour or so and carefully removed the tiny bowls from the fire and placed them in the grass. To my surprise the bowls did not crack or fall apart. When they had cooled enough for me to handle them, I found them to be quite solid and able to hold water without dissolving. At this point I decided to test them further and I placed them, now filled with water, back in the hot coals of the still burning campfire. To my further surprise, the bowls continued to survive and the water in one of them even started to simmer.
At one point during my experiments, I was getting tired of having to process my clay before using it and I decided to try using store bought clay for a couple of my pots. I bought a large block of clay from my local art store and made a number of vessels from it. The store bought clay had a much greater plasticity than the local clay, which made it easier to work with. However, after I fired the pots made from the store bought clay, I found them to be extremely fragile, and, consequently, useless. It appears that the clay I purchased was meant for a modern kiln with higher firing temperatures, which made it less useful for prehistoric-style pottery making.
Building the pot
To construct the pot, I chose to use a blended technique of coiling followed by thinning with a paddle and anvil. To start, I took a fist-sized ball of clay and sculpted it into a sm all thick-walled bowl. This became the base upon which I constructed the pot. When I had completed shaping the base I placed it on a piece of broken pottery which acted as a support for the pot and allowed me to turn the pot more freely as I worked. I then started adding coils in the manner depicted in the video (see below). Basically, my method consisted of sticking a rope of clay on the inside wall of the vessel mouth, pinching the clay rope and vessel mouth together, and then smoothing the clay on the inside of the pot. The video does a much better job of showing how I do this.
When I had finished adding the last of the coils, my pots were usually quite thick (around 1.5 to 2.0 cm). At that time the clay was too wet and soft to do any additional work, so I placed it in a safe place for around 6 to 12 hours depending on the weather (Cats like to sit on fresh clay pots. I once had a clay pot sitting out over night on my patio and, in the morning, found it squashed and covered with a cat's paw prints.).
When the clay had become somewhat  harder and drier, but is still had much of its plasticity, I would start using the paddle and anvil to thin and expand the pot's walls. The paddle is made of a flat piece of wood wrapped with cordage made from the root bark of of the red mulberry. The cord is anchored to the paddle on each end with a half-hitch knot. I also applied some pine resin underneath the cord to help stabilize it on the paddle. I am not entirely sure why people wrapped their paddles in cordage, but pottery shards with distinctive cordage impressions can be found in many places around the world, some of them dating back to over 10,000 bp. Although I have no idea if this was a contributing factor prehistoric to peoples' decisions to wrap their paddles, I've found that the cordage seems to help keep the paddle from sticking to the clay when I'm paddling.
I've used a number of items as anvils including various sized rocks, my fist, and broken pottery shards. Lately, I've been using an anvil I made out of clay and fired with some previous pots. I've seen these custom-made anvils in several ethnographies.
The process that I have used for paddling is best demonstrated by just showing it in a video. A few takeaways for the video would include the fact that I start paddling at the bottom of the pot and work my way towards its mouth. Because of the nature of the clay I am using, it is better for me to keep the mouth of the pot thicker in the beginning to prevent it from collapsing. Also, note that I paddle the pot into its final form over several sessions. This has to do with how my clay behaves under varying levels of moisture. When the pot is first made it is very wet and soft, which is why I make the walls so thick. If I were to try to make the walls thinner when they were so wet, the pot would simply collapse. However, as the clay dries it stiffens an becomes better able to hold up under its own weight. Consequently, as the clay becomes drier and harder, I am able to thin the walls further without worrying about the pot collapsing. At the same time, though, as the pot dries, it also becomes harder and more brittle, so I also need to be aware of when it is time to stop paddling. So far this method has worked fairly well and I've been able to achieve my goal of keeping the pots at around 0.5 to 0.7 cm thick.
A Few Notes on Wall thickness
Based upon a review of available archaeological literature, it appears that many North American prehistoric cooking pots ranged in thickness from 0.5 to 1.0 cm with an average around 0.7 or 0.8. Based upon the individual characteristics of the clay that I am using, a thickness of around 0.6 and 0.7 works well. In my experiences, pottery with thinner walls tends to survive the firing process more often. The thicker pots that I initially made tended to violently “shed” their outer layers when they were being fired. My theory on this is that when the clay in thicker pots is heated next to a relatively uncontrolled fire the outer part of the pot's wall expands to the point that it can no longer stay attached to the clay on the inner wall of the pot. I do believe that it would be possible to fire one of these thicker pots successfully in an outdoor environment if I took more time to gradually heat the pot. However, I have limited time and resources (wood) and I don't see the benefit of producing thicker pots.
Firing

When several finished pots had dried completely, I would fire them with a small open fire. This style of firing is very precarious and, if it is not done carefully, many pots will not survive. In my experience, a number of factors can help determine success:
- Dryness - The pots must be completely dried out. If they are not, they can pop apart or even explode in the fire.
- Weather - Its always best to chose a day with no wind. Even a small breeze can be too great a shock to the ceramics, which will lead to small hairline cracks that shorten the pot's lifespan.
- Gradual heating and cooling times - The more gradually a vessel is allowed to heat up and cool, the more likely it is to survive.
- Vessel wall thickness - This was already covered in more depth in another part of this post, but, generally the thinner you can make the walls the less likely they are to explode during firing.
Thanks to Google Books, I've been able to find a number of historical ethnographic accounts of open pit firing in North America. In particular, I found one academic article, written by M. R. Harrington in 1908, to be very helpful. In t his article, published in the American Anthropologist under the title "Catawba Potters and Their Work," Harrington describes in detail how pots were successfully fired by the Catawba in the early 1900's. For the most part, this is the method that I have followed for my pottery. The following excerpt from page 405 provides a good overview of how both the Catawba and I approached firing:
The first step was to prop the vessels up around the fire, their mouths  toward the blaze... Here they remained for two or three hours, a peculiar black color spreading over them as they grew hotter and hotter. When this color had become uniform — a sign that they were hot enough — John raked the blazing brands out of the fire and inverted the vessels
  upon the coals and hot ashes which were then pushed up around them and the whole covered thickly with pieces of dry bark pulled from old pine stumps... When the bark had
  burned away, the red-hot vessels were pulled out and allowed to cool slowly around the fire. One had cracked, as predicted, and all the pieces were more or less mottled by drafts. The black color of the first
  heating, however, had given place to the typical reddish yellow of Catawba pottery.
The most risky time of the entire process was the point at which I would move to pot from the edge of the fire to the coals. If I didn't do this gradually enough, the pot would come out with cracks. Eventually, I actually changed the process slightly by moving the coals to the pot rather than the pot to the coals. This seemed to decrease the likelihood of cracking. Also, when I was done firing the pots, I would just leave them in place and allow the remaining few coals to burn out and cool. This seems to have led to less cracking than removing the pots from the fire while they were still hot.
Cooking
For me, the aim of this project was not just to be able to construct and fire pottery that resembled some of the oldest known pottery. I wanted to be able to learn how to construct pottery that actually fulfills a function that made it very important to early humans: cooking. Though humans were able to cook food and boil water long before pottery was developed, pottery provided an advantage that, in my opinion, played an important role in the development of human sustenance practices. Thus, for me, the ability to recreate and learn how this technique worked is a very intriguing and worthwhile endeavor.

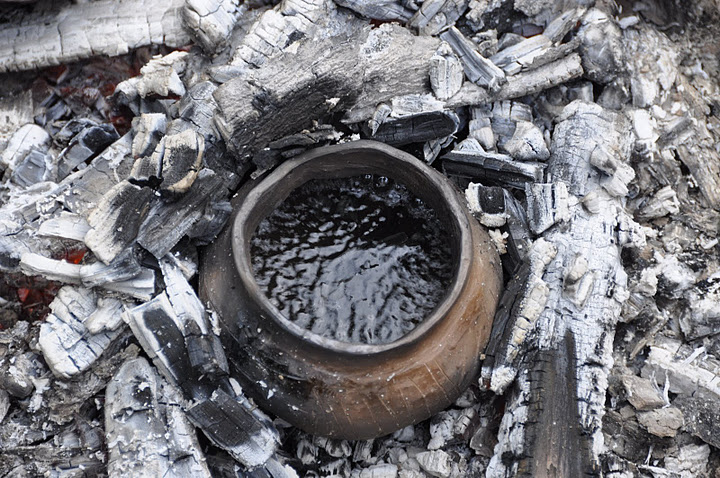
Cooking with pottery is somewhat different than cooking with metal vessels. The clay pots that I have made are clearly not able to holdup to the same kind of abuse that a metal pot can handle, which is probably why many cultures have historically given up pottery whe n metal pots became available. A good example of th can be seen from an experiment I did with one of my early smaller pots. In this experiment I placed the pot, filled with water, into the coals of a fire. I placed it in what seemed to be the hottest part of the fire and within about five to ten minutes the water started a rolling boil. I left it on the fire longer and it began to boil over some. I let this continue for about five
  minutes more and then removed the pot and remaining water from the fire. After the pot had cooled I examined it for damage and I could clearly see hairline cracks running through the pot in an area of the pot that had been near a particularly hot cluster of coals. The cracks were not superficial and I was able to pull the pot apart with minimal pressure. My kitten, Catalina, claimed the remains of this pot for herself. I think she likes the way these pots smell.

Clearly, from this experiment, I realized that I would have to research and experiment some more to figure out the best way to use these pots for cooking. The process of developing a successful method of cooking with these pots has been long and frustrating and there is a pile of broken pot shards in my back yard. However, in spite of repeated failures I have made a number of observations that I have found useful in prolonging the life of the pottery:
- Before placing the vessel on a fire, I fill it with water and allow the water to soak into the walls for five or ten minutes. As I see it, the vessel is porous and will become waterlogged anyway, so its better to allow the the damp vessel and unheated water to become gradually warm together than to allow the dry vessel become hot before subjecting it to the shock of unheated water. However, I haven't tested this theory out in any thorough way.
- It's better to allow the vessel and its contents to warm up more gradually than one would with a metal pot.
- The amount of moisture loss that can occur with these pots is phenomenal. Consequently, having another pot nearby with water that has been warmed by the fire is helpful.
After running a few water boiling experiments with my pots, I began to suspect that wood fire is not a good way of creating an adequately controlled environment for testing. First, keeping a fire going for an extended period of time uses up a lot of fuel. Second, I had a hard time of controlling how intensely the wood burned, which w as depen
 dent on a large number of environmental factors (e.g. wood moisture, wind, etc). In an effort to simplify these matters, I purchased a small out-door camping stove from REI and created a simple metal suspension system that could hold a pot over the burner. The system worked very well. However, the appearance of small hairline cracks at the bottoms of vessels after only being used with the stove one time was concerning and led me to wonder if the camping stove was providing too much heat in too small an area of the vessel.
In order to test my theory, though, I really needed to be able to measure the temperature of not just the water, but also the vessel's external surface.  To do this, I purchased an infrared thermometer capable of measuring a very wide range of temperatures from a safe distance. It is also very good for pinpointing places in your house where the insulation is inadequate, which is a problem in my house, and, consequently, how I justified purchasing it.
In using the infrared thermometer, I hoped to answer the following questions.
- how hot the pots are getting over the camping stove and at what temperature the hairline cracks begin to appear.
- The lowest temperature (external) that will lead to boiling water.
- how hot the pots are getting under various types of heat sources (e.g. actively flaming, bed of coals, etc).
- What effect variables such as temper and wall thickness have of the amount of heat that is required to produce a boil without destroying the pot.
Using one of the pots that I had fired and my trusty thermometer, I set out to conduct my boiling experiments. The following consists of my notes from these experiments:
Test 1: Camping Stove
E = temperature of the exterior surface of the vessel
W = water temperature
F = temperature of fire near the vessel
Temperatures in Celsius.
| Time | F | E | W |
|
| middle* | bottom* |
|
| 06:37:00 PM | 563 | 17 | 17 | 17 |
| 06:41:00 PM | 585 | 77 | 438 | 40.5 |
| 06:46:00 PM | 523 | 113 | 501 | 42.8 |
| 06:51:00 PM | 609 | 120 | 512 | 57 |
| 06:56:00 PM | 482 | 149 | 504 | 69 |
| 07:01:00 PM | 567 | 120 | 494 | 83 |
| 07:06:00 PM | 530 | 158 | 502 | 93 |
| 07:07:00 PM | 520 | 150 | 465 | 102 |
| 07:11:00 PM | 528 | 151 | 528 | 110 |
* Middle was a measure of the external vessel temperature at the middle point between the vessel's base and mouth. Bottom was a measure of the external vessel temperature at the vessel's base.Please note that the temperatures of the water that exceed 100 degrees Celsius are most likely the temperatures of the steam escaping from the water's surface.
During Test 1, the bottom of the vessel began to glow red from the heat of the camp stove. Cracks gradually formed at the bottom of the vessel and by the conclusion of the experiment water was steadily dripping from the bottom.
Test 2: Campfire with a new vessel
| Time | F | E | W |
| 10:11:00 AM | 775 | 12 | 14 |
| 10:24:00 AM | 600 | 120-180 | 87 |
| 10:27:00 AM | 600 | 160 | 90 |
| 10:29:00 AM | 600-700 | 130 | 119 |
| 10:33:00 AM | 530 | 123-200 | 109 |
| 10:37:00 AM | 550 | 150-220 | 115 |
| 10:52:00 AM | 600-700 | 125-155 | 115 |
Please note that because the base of the vessel was embedded in the campfire coals, I was not able to measure its temperature. Therefore, the single external temperature measurement, is only a measure of the temperature at the middle of the vessel's external surface. Initially, I had expected that, as with the vessel in test 1, the base of the test 2 vessel would become roughly the same temperature as the surrounding fire. However, during test 2, and in subsequent experiments, I noticed that the coals in the camp fire that were immediately next to the vessel base had gone out (possibly due to moisture from the pottery's porous wall). Consequently, it appears that the amount of heat transmitted from the campfire to the base of the vessel may have been less than initially anticipated.
After the test, I checked the status of a few preexisting hairline cracks along the lip of the vessel and looked for any new cracks. No changes were noticed in the sizes of the cracks and no new cracks were observed.
When the conditions of tests 1 and 2 are compared, it is difficult to say for sure why the vessels used with the camping stove are destroyed so quickly, though it seems possible that this phenomenon is associated with the way in which the camping stove concentrates its energy on one small portion of the pot. Consequently, though camping stoves are easier to use for experimentation, it appears that they don't effectively emulate a campfire.
After the comparison between tests 1 and 2, I decided to focus my efforts on further testing my pottery's endurance in campfires. The following two tests were carried out with the vessel that was used in test 2.
Test 2a: Second Campfire
| Time | F | E | W |
| 03:15:00 PM | 792 | 150 | 111 |
And again...
Test 2b: Third Campfire
| Time | F | E | W |
| 03:40:00 PM | 580 | 170 | 113 |
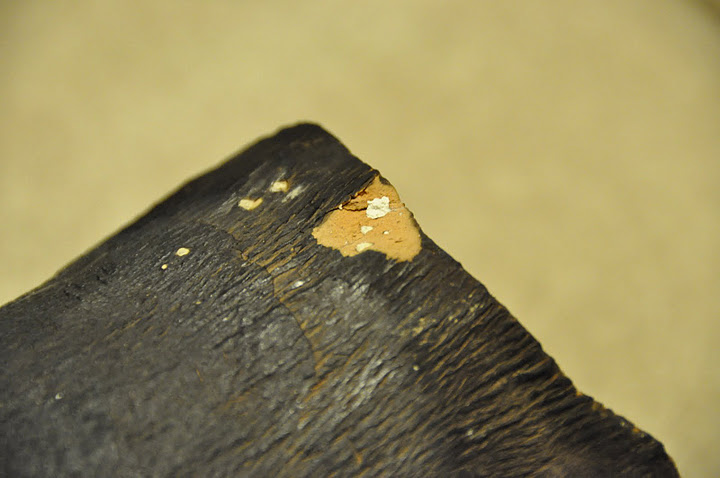
After the third test, I did notice some external flaking along the bottom of the vessel in which pieces of the e xterior vessel had fallen off. Based upon the appearance of the embedded shell temper that was exposed by the recent flaking, I've deduced that the flaking is most likely caused by a phenomena called "spalling." Spalling can occur when pieces of limestone or shell embedded in clay are fired at a temperature above 600 degre
 es Celsius. At around this temperature the calcite in the shells converts to calcium oxide and, upon exposure to water, then changes to calcium hydroxide, which has a larger volume than the original calcite. This increased volume can exhert enough pressure within the wall of the pottery that the vessels can eventually crack and break apart.
One fortunate factor in this experiment is that when I fired this particular pot, I had already purchased my infrared thermometer and was able to take some good temperature measurements during the firing, which are available here. In sum, the notes indicate that, of the three vessels that were fired, the vessels labeled "1" and "2" attained the highest temperature with "2" remaining above 700 degrees Celsius for the longest amount of time. Vessel two also happens to be the vessel that I used in test 2, 2a, and 2b. Thus, it is not surprising at all that this vessel exhibited spalling shortly after its first couple of uses. Subsequent experiments with vessel 1 have not, as of yet, led to any spalling, suggesting I should avoid firing shell-tempered pots at temperatures above 700 degree Celsius for any length of time.
Conclusions
Obviously, in order to acquire the data necessary to answer all of my previously stated questions, I would have to do a considerable amount of additional  experimentation. With limited resources, though, I will likely have to settle for what I currently have. Ultimately, though there are still many questions that need answering, I feel fairly confidant that I was able to attain the goal of learning how to reproduce prehistoric pottery that is able to function as a cooking vessel. Though it took a lot of experimentation, research, and failures along the way, I feel that the end result and the things I learned along the way were worth the effort.

 My experiments with pottery have been productive, though somewhat limited. In late spring of this year I came down with a case of Rocky Mountain Spotted Fever. This set me back in all of my projects a good month and a half and left me lacking motivation for most of the summer. In spite of this set back, I was able to have two separate pottery firings. The first one ended in tragedy when the durecho of 2012 came hurtling in and drenched all three pots. In the second firing, I lost two pots to hairline cracks, but the third one turned out well. The cracks may have been caused by impatiences on my part. I may have been too eager to heat the pots and caused heat-shock. It also was somewhat gusty that day.


